This guide covers the usage of PayPal buttons created using the PayPal WP Button Manager for WordPress plugin. If you need help installing or configuring the plugin prior to getting to this point, please see our docs specific to that.
Video Demo
General Documentation
Create a New PayPal Button
- From the WordPress admin panel, click on the PayPal Buttons tab from the menu.
- Click the Add PayPal Button button at the top of the page.
- Enter a title/name for your button. This is for you to see only, and can help to easily find buttons when you have many of them saved.
- Choose which company / PayPal account you would like to create this button for.
- Follow Steps 1 – 3 in the button wizard to create your PayPal button.
- You may choose between various types of buttons (ie. Buy Now, Shopping Cart, Donation, etc.) and the options on the form will update based on the type of button you are creating. Fill out the fields appropriate for your button and then move to Step 2.
- Keep the “Save button at PayPal” box checked to make the button a hosted button. This provides better security than non-hosted buttons because the pricing details and seller details are not included in the HTML code that goes on the website. It is recommended that you keep this checked.
- The final step in the button wizard allows you to include optional details for the button which you may or may not need. Set the radio buttons per your requirement, and check the boxes to enable a Cancel URL, Return URL, or IPN URL.
- Click “Create PayPal Button” to submit the API request to PayPal and create the button according to the options you have configured in the button wizard.

PayPal WP Button Manager Button Wizard
Place a PayPal Button on a WordPress Page or Post
After your button is created you have multiple options for displaying the button within WordPress pages or posts as well as in an email or a basic link.

- The easiest way to place a button in WordPress pages or posts is to use the PayPal Shortcodes drop-down list in the visual content editor. All of the buttons you have created will show up in this list. Just place your cursor where you would like the button to show up and add click the button from the shortcodes list to add it.
- You may use standard WordPress shortcode syntax with the button ID as the only required attribute. Simply copythe shortcode from the button details page and paste it in your page or post content accordingly.
- If you would prefer to work with the full HTML snippet created for the button you may copy it from the button details page and paste it in the text editor for any WordPress page or post where you would like it to be displayed.
- If you would like to include the button as a general link for email or social media purposes you may copy the URL value from the post details and paste it where you would like it to be used. This would generally be used outside of WordPress.
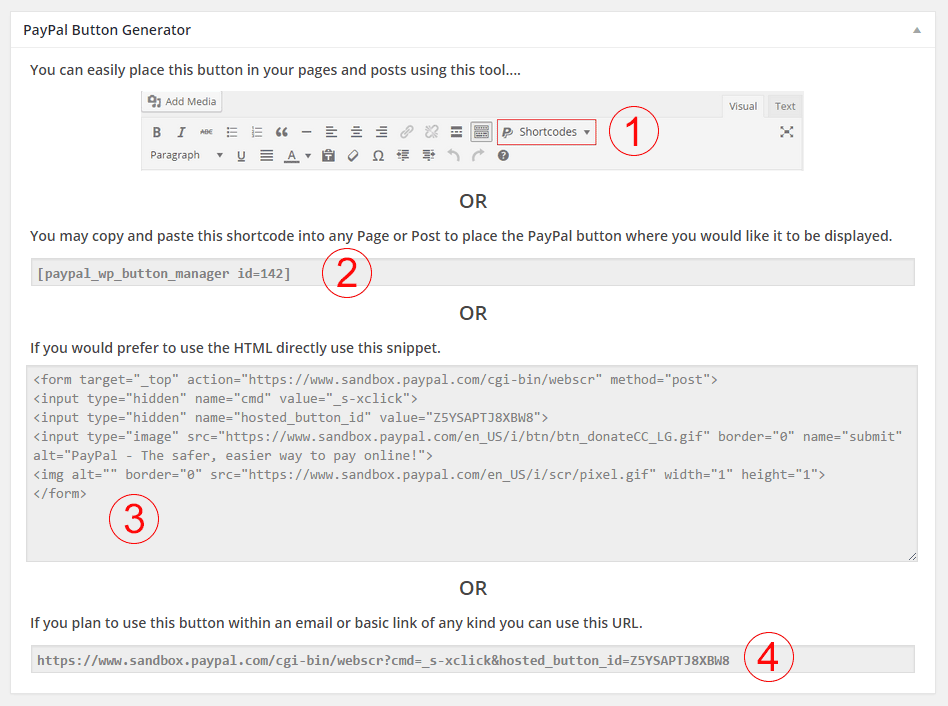
PayPal WP Button Manager Button Placement Options
Managing PayPal Buttons
- From the WordPress admin panel, click on the PayPal Buttons tab from the menu.
- From here can see a list of the PayPal buttons you have created as well as search for any particular button by name.
- You may also edit or trash buttons the same you would any other WordPress post.
- If you permanently delete a PayPal button you will be given a message asking if you want to also to delete the button from your PayPal account (if it is a hosted button.) Say OK to delete the button from WordPress and PayPal, or Cancel to only delete the button from WordPress.

PayPal WP Button Manager – Manage Buttons
Can you tell me how to change the quantity of the purchase. This site is selling tickets and it only showing quantity of 1. Some of the buyers may want to purchase multiple tickets
You should have the option to include a qty box so people can enter that on their own. Are you not seeing that during the button creation?
I’m guessing that Stephanie might have configured the button as a Buy Now instead of a Shopping Cart button. Buy Now doesn’t allow specifying quantity without a special parameter that your plugin apparently doesn’t access (you may want to add that as a Customize Button option).
would be nice to be able to set width and height from inside the plugin – right now the image used is tiny.
If your image is small then your theme is probably doing something with img tags in CSS. If you can provide a link to the URL where the button is showing up I can take a quick look to try and give you a tip on fixing it.
I have watched your helpful videos and completed all the steps but continue to get an error message when I click on the paypal button from my site. It says, “The link you have used to enter the paypal system is invalid. Please review the link and try again.”
This is the last thing I need to finish before launching my site. Please help!
Do you have logging enabled? Please submit a ticket here and provide a copy of the log file. You’ll need to zip it before you can attach it to the ticket.
Once the button is created how do I edit the dropdown menu for the button?
When I click on the “Edit” link in the PayPal Button list, it just tells me how to use the button.
Thank,
Unfortunately, as of now you’ll have to delete the button and create a new one if you need to make adjustments. We will be adding the ability to edit existing buttons in a future update. I’m sorry I don’t have better immediate news for you on that.
You can edit a button by logging into PayPal you can so into the site map and look for “Manage PayPal Button”
Once in there, click on the one you want to edit.
I get this error when creating buttons:
Error Code: 11932
Error Details: You must specify a corresponding number of entries for option names and selections.
What am I doing wrong?
Do you have logging enabled in the plugin? I’ll need to get a look at that to get an idea of what might be going wrong here. Please submit a ticket here and attach the log from the plugin.
It would be really good to be able to import existing hosted buttons so you could then edit and manage them!
Please submit feature requests to our help desk, and we’ll be happy to get it added!
Hi
Just installed the plugin and it is working fine. There is one thing I do not understand: I want to add a different button (my own). There is a field in the settings, stating “Use your own button image”. What link to add here?
Thanks
Jakob
You would paste the URL to an image you would like to use as your button image. So you could use a URL pulled from your WP Media Library, for example. Really, that should be setup as an image uploader function in WordPress. I’m going to add a ticket to improve that in a future release, but for now you could just upload an image to your WP Media Library and then copy/paste the URL it gives you for that image into the field you asked about here.
Hi Andrew
The plugin works great, no issues at all. Many thanks to letting me know about uploading my own button image. Pleaqse let me know when you have an update available.
Many thanks for your help!
Jakob
The button does not show up on my website!
Please submit a ticket here and we’ll see if we can help you get this figured out. Thanks!