Target Audience
Please make sure you have installed the PayPal for WooCommerce plugin to prepare for this step.
Introduction
PayPal Complete Payments is a full-stack solution that provides a wide variety of features and functionality for sellers.
Allow customers to pay via Credit or Debit Card, PayPal Checkout, Pay Later and Venmo, as well as a variety of alternative payment methods based on the country you are located in.
All of this and more tied into a single PayPal payments integration. Just follow the steps below to be up-and-running in no time!
2. Begin the Onboarding Process
Depending on whether you are a new user or an existing user upgrading to PayPal Complete Payments you will see one screen or another.
New Users
Click the Start Now button to begin the process of connecting your PayPal account to the plugin.
Upgrading from PayPal Classic?
Click the “Update to PayPal Complete Payments” button to begin the upgrade procedures.
If you are running WooCommerce subscriptions, any active profiles you have linked to PayPal Classic Express Checkout and/or PayPal Pro will be updated to use the new PayPal Commerce gateway.
Notes to Consider
Account Connection / Creation
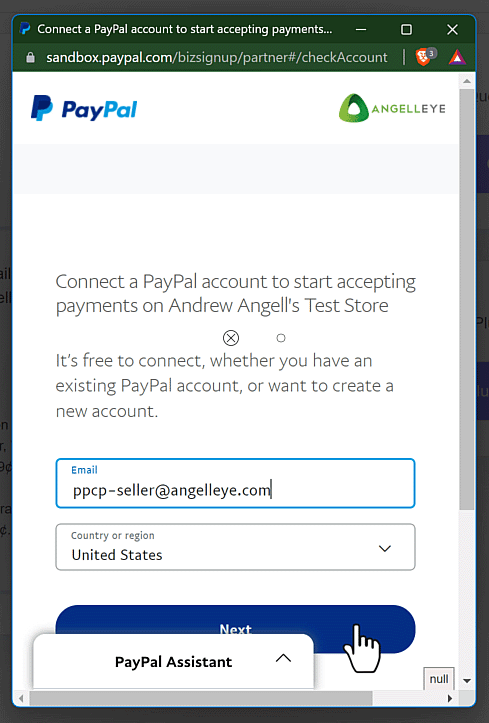
- If you already have a PayPal account it will then ask you to login to the existing account.
- If the email you entered is not linked to a PayPal account, then it will walk you through the steps to create the new account.
Sandbox Testing
- If you are trying to configure the plugin for testing purposes with the PayPal Sandbox, you will first need go to WooCommerce -> Settings -> Payments -> Complete Payments – Built by Angelleye.
- From there you can enable Sandbox Mode, and then click to return to these Setup screens from there.
NOTE: Depending on your account type and settings you may be asked to verify some of your identity and business details during this onboarding flow. Just fill out the info accordingly and continue through the screens until you get to the screen that says “Go back to…” so you can click that button.
4. PayPal Account Connection Complete!
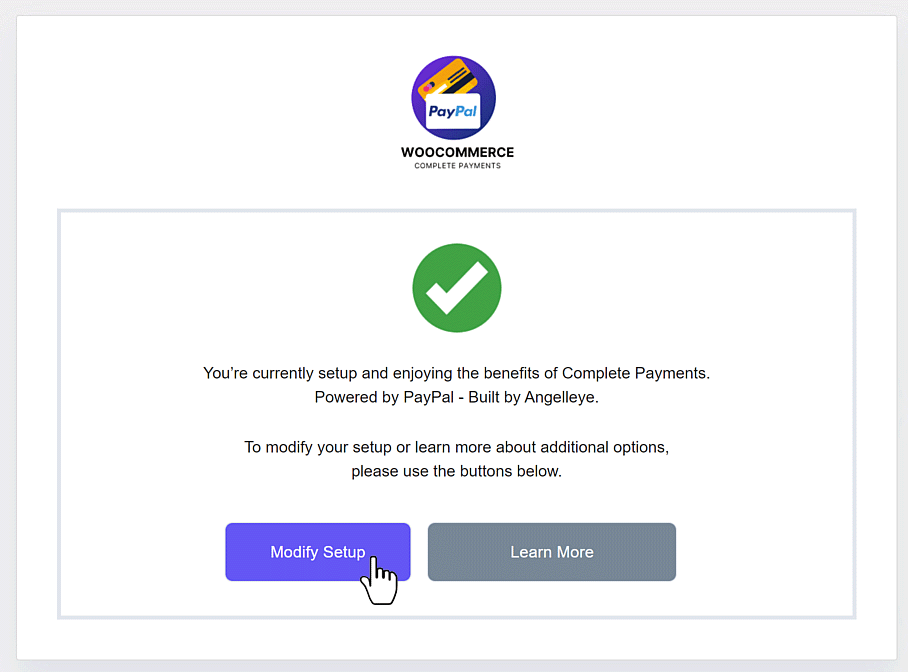
Congrats! At this stage you now have PayPal Complete Payments fully connected and ready to accept payments on your site!
There are many options available in our plugin so that you can fine-tune where buttons are displayed, how they look, and more.
Click the Modify Setup button to load the page with these options.
5. Modify PayPal Complete Payments Options
There are two ways to get into the PayPal Complete Payments settings panel from the WordPress admin panel.
Initial Setup
Enable/Disable
Check this box to enable the PayPal Commerce – Built by Angelleye gateway on your WooCommerce website.
Title and Description
These values may or may not be displayed on your WooCommerce checkout page depending on how your theme design is using them.
PayPal Account Settings
PayPal Sandbox
If you would like to run tests using the PayPal sandbox, check this box to enable this mode. You will then need to connect a PayPal sandbox seller account to be used for test purposes.
PayPal Connection / Merchant ID
You will see a notice about whether or not you have successfully connected your PayPal account for use.
If not, click the Go to Setup button and follow the steps to connect your account from there.
Location Specific PayPal Button Placement and Display Options
Product, Cart, and Checkout Page
The PayPal button stack provides a variety of ways to control the look and feel of payment buttons on your website as well as the user experience based on the payment type selected.
With Smart PayPal Buttons you can customize the following aspects of your payment buttons:
- Size, Color, and Shape.
- Payment types: PayPal Checkout, PayPal Credit, Credit Cards, and Venmo
- Layout: Horizontal vs. Vertical button display.
For each section – Product Page, Cart Page, Checkout Page, and Mini-Cart, you can adjust similar options for the way the buttons will “look and feel” on your site.
All of these options are set by default to the best option PayPal recommends specific to the page the buttons will be displayed on. This is based on split testing the buttons to find the best conversion rates based on the specific location of the buttons.
If you want to adjust these options to better suit your site design / preference, just make the changes, Save, and then reload that page on your site to see the effect.
Enable/Disable
This allows you to enable or disable the PayPal button stack on your checkout page.
Checkout Page Display
Choose where to display the PayPal button stack on your checkout page.
Display at the top of the checkout page.
This will place the PayPal buttons above the checkout forms on the page, allowing customers to checkout without filling out the forms.
Display in general list of enabled gateways on checkout page.
This will place the PayPal buttons below the checkout page in the WooCommerce payment gateways section. Customers will fill out the checkout forms, and would then see PayPal options included along-side any other payment gateways you have enabled in WooCommerce.
Display both at the top and in the general list of gateways on the checkout page.
This will place the PayPal buttons both above and below the checkout. Customers will have the option to skip the forms and checkout more quickly, or go ahead and fill out the forms and checkout using the options below.
Enable/Disable Smart Buttons
By default, the PayPal button stack uses the “Smart Buttons” when included in the regular list of gateways on the WooCommerce checkout page.
If you prefer to make this more generic like other payment gateways you can disable smart buttons here.
(Not Recommended)
Hide Funding Method(s)
By default, all of the buttons available in the PayPal button stack will be displayed. This includes PayPal Checkout, Pay Later, Venmo, and Credit/Debit Card.
If you would like to hide any of these methods, add that method here, and that button will be hidden from that location.
Button Options
There are many options for the button layout, color, shape, size, height, label, and tagline.
These are all set based on PayPal recommendations after spliting testing to find the best converting buttons specifically for a checkout page.
If you would like to adjust them to better suit your cart page design you may change the them, save settings, and reload that page on your site to see the result.
PayPal Pay Later Messaging
PayPal for WooCommerce incorporates the most effective ways to promote PayPal Pay Later based on best practices, visuals, and guidelines.
Much like the button options, there are location specific settings available for where and how to display the Pay Later promotions.
Enabling these promotions informs your buyers that you offer these Pay Later services, and can increase conversion rates as well as average order totals.
Please take a look at our detailed article on PayPal Buy Now Pay Later Integration.
Subscriptions (Tokenization)
In order to use plugins like Woo Subscriptions, Funnel Builders, or token payments of any kind, you will need to have the PayPal Vault approved and connected.
Click the button to Connect the Vault, log in to the same PayPal account you initially connected the plugin to, and approve the Vault functionality.
Once you return to the settings and you see a green check mark next to Tokenization / Subscriptions, then you know you’re ready to rock!
Save Payment Method at Checkout
Enable tokenization to give your buyers the option to save their payment method at checkout. Next time they buy from you, they will see a list of saved payment methods, and they can choose one of those for a fast checkout!
WooCommerce Subscriptions
Once the PayPal Vault is connected on your site, you will be able to use the Woo Subscriptions plugin to create and manage subscription profiles.
This utilizes reference transactions (token payments) so you will have complete control over processing renewals, updating profile details, etc.
Reference Transactions
Create a new order on behalf of your customer, and process it automatically using the previously saved payment information.
Funnels / One-Click Up-sell
Make your upsell funnels shine with one-click payment functionality. No need to continue logging in or entering CC details. After the initial payment, a single click triggers another payment…and another…and another…
Apple Pay
In order to provide Apple Pay as a payment option on your WooCommerce website, you will need the functionality approved and enabled for your PayPal account.
If Apple Pay has not yet been approved on your PayPal account you will see a button to Activate it.
Click the button to Activate Apple Pay, log in to the same PayPal account you initially connected the plugin to, and proceed with approval.

Once you return to the settings and you see a green check mark next to Apple Pay, then you know you’re good to go, and you can ignore the following Domain Management step.

Domain Management
When you activate Apple Pay, your site domain will be registered automatically with Apple as part of the process.
If this step fails for any reason, you will need to register your site domain manually.
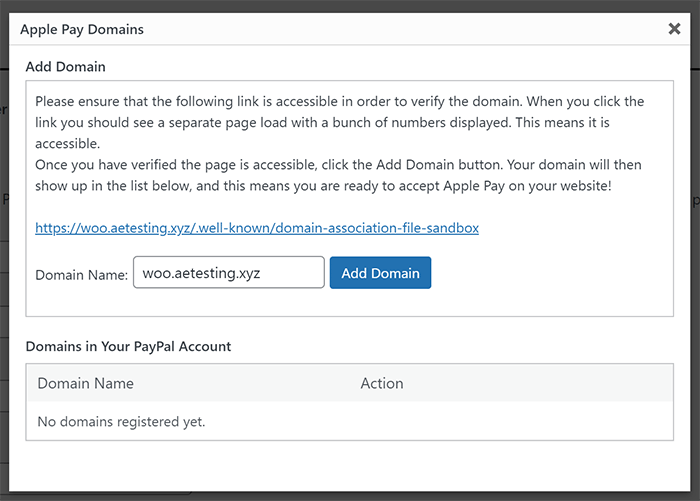
Click the Manage Apple Pay Domains button and you will be presented with a simple domain manager window:

Click the link to ensure a page with a bunch of numbers is displayed. This is the verification page that Apple will use to verify your domain.
Then verify that the Domain Name entered matches your website domain, and click the Add Domain button.
This will register your domain, and then you will be fully approved and active with Apple Pay!
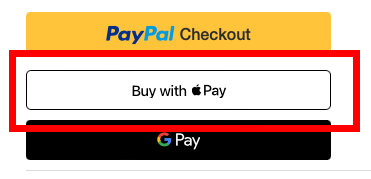
Once Apple Pay has been activated and enabled in your PayPal for WooCommerce settings, you will see an Apple Pay button displayed for payment when using an iOS device or Safari browser.
Frequently Asked Questions
For more details about Apple Pay and how it works with WooCommerce, please review our frequently asked questions.
Google Pay
In order to provide Google Pay as a payment option on your WooCommerce website, you will need the functionality approved and enabled for your PayPal account.
If Google Pay has not yet been approved on your PayPal account you will see a button to Activate it.
Click the button to Activate Google Pay, log in to the same PayPal account you initially connected the plugin to, and proceed with approval.

Once you return to the settings and you see a green check mark next to Google Pay, then you know you’re good to go!

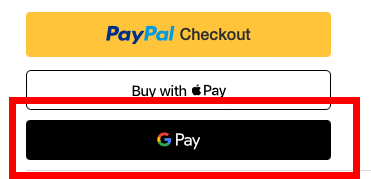
Once Google Pay has been activated and enabled in your PayPal for WooCommerce settings, you will see an Google Pay button displayed for payment when using an Android device or Chrome browser.
Frequently Asked Questions
For more details about Google Pay and how it works with WooCommerce, please review our frequently asked questions.
Advanced Settings
Payment Action
Payment Action allows you to adjust how you want to process the original transaction.
- Capture: This option will immediately capture the funds and move the money into your PayPal account.
- Authorize: This will authorize the funds for the transaction on the buyer’s account, but it will not actually capture the funds and move any money into your account.
- When you are ready, you may capture the funds for the authorized order from the WooCommerce order screen.
Please take a look at our detailed article on WooCommerce PayPal Authorize and Capture documentation.
Invoice Prefix
The Invoice Prefix option allows you to set a value for the prefix on invoice IDs generated by WooCommerce.
This can help resolve duplicate invoice issues that may arise if you’re using PayPal Complete Payments on multiple websites.
Skip Final Review
Enable this option to eliminate the additional review page that shows up when PayPal returns a user to your site.
- The checkout system does not know the buyer’s shipping address until after they have signed in to PayPal. Once they are returned to your site, shipping and tax are calculated based on the shipping address returned by PayPal. A final review page is displayed to break down the buyer’s final totals before completing the order.
- If you are selling products that do not require shipping and/or tax, you may decide to skip this final review page so that users will complete their payment on the PayPal pages. With this option enabled, PayPal will redirect the users back to your final “checkout complete” page instead of a review page, and there will be no further action required to complete the payment.
Coupon Codes
Enable this option to allow usage of Coupon codes on the Final Review page.
- Usually, coupon codes are only allowed on the Cart page or the checkout page.
- Enabling this option will allow the customer to enter a coupon code even after returning from the PayPal payment popup.
Brand Name
This controls what users will see for the brand/company name on PayPal review pages.
Landing Page
With this option, you can choose which type of page the user should see by default when they reach the PayPal login.
- No Preference: Decided by PayPal based on the customer’s previous logins.
- Login: This will make the PayPal login option the default option.
- Billing: This will make the full credit card form the default option and is more obvious to non-PayPal users that they can pay you without creating an account.
Instant Payments
If you enable this setting, PayPal will be instructed not to allow the buyer to use funding sources that take additional time to complete (for example, eChecks).
Instead, the buyer will be required to use an instant funding source, such as an instant transfer, a credit/debit card, or PayPal Pay Later.
Billing Address
When a buyer uses a PayPal Checkout from a product page or the shopping cart page on your site, the application does not know their address because they are skipping the checkout page.
In these cases, PayPal returns a shipping address to the site, and by default, this is the only address that gets saved with the WooCommerce order. The billing address gets left blank.
Enable this option if you would like the WooCommerce order to populate the billing address using the same address that PayPal returns for shipping
Send Item Details
Check this box to send all of the cart’s line item details and the break-down of shipping, tax, and handling to PayPal.
This will make all of those details show up nicely in the PayPal transaction details screen within your PayPal account.
If you do not want this for any reason, disable this option, and only the order total without any itemized details will be sent to PayPal.
Advanced Credit Cards
PayPal Advanced Credit Cards adds direct credit card processing to your site exacly the same as Stripe, Square, Authorize.net, or any other card processor.
The buyer can choose to “pay with PayPal” if they want, or they can enter the credit card details directly into the Advanced Credit Card gateway.
When using the direct credit card fields they will never be redirected through any PayPal login or pop-up of any kind. It’s an entirely direct experience for credit and debit card processing.
Also, you get a lower rate of 2.69% when people pay this way vs. the 3.59% that gets charged when people checkout with PayPal!
Check out our blog about Advanced Credit Cards for more details.
Contingency for 3D Secure
Standard payments and advanced credit and debit card payments processing includes support for providing customer authentication with 3D Secure.
Use 3D Secure to authenticate cardholders through card issuers.
It reduces the likelihood of fraud when you use supported cards and improves transaction performance.
A successful 3D Secure authentication can shift liability for fraudulent chargebacks from the merchant to the card issuer.
Enable/Disable Separate Fields for Credit Cards
By default, the Advanced Credit Card fields will be placed immediately below the PayPal button stack, all as part of the same gateway on the WooCommerce checkout page.
Enable this option to separate the PayPal buttons from the direct credit card option, so that they will be two different radio buttons on the checkout page.
Advanced Credit Cards Title
If you have enabled the option to separate the PayPal buttons and the Advanced Credit Card form, this title will be used as the label for the Credit Card option in the WooCommerce gateway options on the checkout page.
Advanced Credit Cards Position
If you have enabled the option to separate the PayPal buttons and the Advanced Credit Card form, this will adjust whether the Credit Card option is displayed before or after the PayPal option.
Disable Specific Credit Cards
If there are any specific credit card types that you do not wish to include on your site, choose them from this list and they will be hidden.
Credit Card Statement Name
Enter the name you would like customers to see on their credit card statement when purchasing from you using Advanced Credit Cards.
Error Email Notifications
Enable this to have an email sent to the site admin account any time a PayPal API error occurs.
Debug Log
Set how you would like to handle PayPal logs.
Everything
Log every API request and response regardless of the result.
Errors and Warnings Only
Only save logs if an API error/warning occurs.
Disabled
Do not save any logs of any kind.
It is recommended that you enable Everything so that we have as much data as possible should we ever need to troubleshoot a problem.
However, you should make it a habit to clear these logs out on a regular basis so that they do not grow large and cause drive space problems on your hosting account.
Looking for Live Help?
Schedule a live meeting with Drew Angell, PayPal Certified Developer, and get all of your questions or concerns answered.
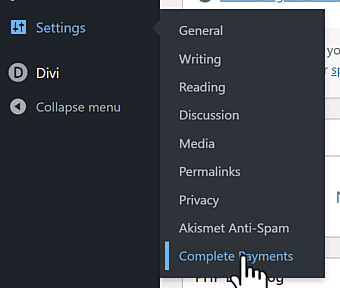





Hey, is this feature available yet? I cannot seem to find “PayPal Complete Payments” as a payment gateway yet in my control panel with the plugin installed
So sorry for the confusion. We jumped the gun on updating our documentation, and we have not yet released the update that includes this. It’s coming very soon! For now you can use Express Checkout as usual.
Hey
I’m using complete payments with checkoutwc plugin but it only shows paypal button and does not shows venmo or any other methods. Im not hiding any methods in settings.
Another thing i also use paypal express checkout and also can’t show more that paypal button
I actually just created a ticket to make sure our Complete Payments integration is working seamlessly with CheckoutWC the way we had our Classic Express Checkout working with it. I think there are some adjustments we need to make for it to be perfect.
You shouldn’t be using Classic Express and Complete Payments together, though. I’m a little confused what you’re trying to do there. Please submit a ticket to our help desk and I can help you more directly with that.
I had to use express checkout because when i tried to use complete payment in both payment list and before checkout form paypal button appears just under the logo and I’m using two step checkou page. When i go to the payment step the express checkout still there and also the button on the payment list which will make customer confusion. But using express checkout only for express checkout button works perfectly fine and disappearing at the payment step
Hi, just updated paypal and saw that the Unable / Disable option has vanished for ‘PayPal Classic Payment Gateway’.
I would like to keep it enabled until my client is ready to use the ‘PayPal Complete Payments’ option. So is it enabled by default or not? And will it work as usual or do I need to change / add anything again?
Hi, sorry for the confusion. The original gateways you were running are still enabled when you update. You have to click into the Classic gateway list to see all of them, and then you’ll find all those additional settings. Let me know if you have any questions or concerns about that.
I gave this a try tonight, and I ended up with an issue where I would receive an error message on my checkout page or cart page when I clicked any of the paypal related payment buttons
“The requested action could not be performed, semantically incorrect, or failed business validation.” I was looking here for any documentation that might help me discover the source of this issue.
I’m going to keep poking around to see if I can’t figure it out.
Hi Jay,
I’m sorry you’re having troubles. I’m not able to reproduce that myself. Please submit a ticket to our help desk and provide logs created by our plugin. We’ll be happy to take a closer look and figure out what’s going on.
Thanks!
Drew
Hi Jay,
Did you get our v3.0.2 update applied? I believe it would have resolved the issue you’re referring to here based on my info here.
Please check and get a ticket created if you’re still having problems on that version. Thanks.
Drew
I applied that update early this morning. And I tried complete payments again, but the result was the same. I’ll open a ticket this morning, because this does appear to be an improvement and I’d like to have it in place for BF
Hmmm, interesting. Yes, please get that ticket submitted so we can take a closer look and we’ll be sure to get you taken care of. Thanks!
Hi, single product do open paypal popup on product page but with variations its not working please advice what could wrong.
Thanks for the feedback. I’m going to get a tiket created for this in our help desk, and I’ll work with you more directly there to see what’s going on here.
Hi, I have now set up the new PayPal Complete and hope it is going to work fine. However, the Sandbox setup puzzles me. I cannot find any link at PayPal on how to set up a Sandbox login, password etc
It used to be done while logged in to the PayPal account, if I remember right?
Hi Jan,
Sandbox accounts are configured through https://developer.paypal.com. You do sign in there with your live PayPal account, and then from there you can create sandbox accounts. Then when you have Sandbox enabled in our Complete Payments gateway you’ll just click the Connect button and use the Sandbox account credentials that you’re testing with to hook it up. Let me know if you have any questions or concerns about that.
Thanks!
Drew
When doing the PPCP connection process, it is not clear what I am connecting to.
It is asking me to allow Angelleye LLC access to my account – can someone clarify that the Paypal account is only connecting directly to our website / paypal plugin? and no datasharing is going outside to another 3rd party.
Hi. Sorry for the confusion with that. We are a PayPal Partner, and the app is hosted by us. The onboarding is simply granting access for our PayPal approved and certified app (plugin) to make API calls on your behalf. All of the interaction with payment processing happens with your PayPal account directly, and we don’t keep any extra fees or anything like that. The only “datasharing” that would be happening is anything PayPal has built into their Smart Buttons, which is there no matter how it’s integrated. There is an opt-in with our plugin that if you agree to would then give us your site domain just so we can get an idea of who’s using our stuff, but if you don’t opt-in we won’t get that, and there’s never any sort of data sharing about you or your customers. Hope that helps clarify things. Let me know if you have any questions or concerns about that.
I be honest your reply has left me even more confused.
It is not clear from your reply if when I click on connect I am connecting my website directly to Paypal or NOT?
Also reading through the plugin code at github, there seems to be data being sent to an AWS server – can you explain what this is about and what data is being sent to AWS?
Hi, I’m sorry for the confusion (and the delay replying). We are a PayPal Partner, and the new PayPal Commerce Platform APIs work through 3rd party onboarding and permissions. Our app onboarding scripts are what’s hosted at AWS, and it simply allows you to “connect PayPal” which grants our app permissions to make API calls on your behalf for payments. It doesn’t give us any direct access to your account or anything like that. Let me know if you have any questions or concerns about that.
Very often we have customers who check out with PayPal (using this plugin) and they don’t realize that PayPal is injecting the shipping address of their PayPal account, not the shipping address they put in at checkout.
I do have the paypal button enabled on my checkout page and cart page. The situations usually are the person is on vacation and want the product shipped to a different address. or they moved and failed to update their PayPal address.
This happens often enough, at my own expense, to break down and ask about the possible solutions for preventing this.
I understand that PayPal wants us to ship to the verified address, totally get why, and I prefer this too. But it seems like the customer is unable to review this address, or they are not informed that the address was changed, or they simply don’t notice because it’s not apparent enough.
Do you have any suggestion? Any settings change? Any methodology at helping prevent this situation – because I take it on the chin each time it happens by shipping a replacement order to these customers.
Let me correct a few things. 1) my PayPal button does NOT show up on my actual checkout page, however it IS listed as a payment option along side credit card and such in the payment methods, after the entering of addresses.
2) The shipping address when I test payment with palpay clearly shows me the shipping address right up front and center in the PayPal popup window along with a link to change the shipping address.
Still though, I’m looking for any best practice to minimize this mistake people make
Okay, so it sounds like you have people going through the Woo checkout page and entering addresses. Then choosing PayPal from the regular list of gateways, right? That should flow as I mentioned previously. Are you using PayPal Complete Payments in our plugin, or are you using the Classic Express Checkout option in the plugin?
So you are seeing that they can adjust their address, but people just aren’t doing it..?? I guess I’m a little confused about where this is breaking down for you.
Please go ahead and create a ticket as I mentioned. If you can provide staging site credentials so we can review your setup that would be helpful. Thanks!
Some of this could depend on your theme/checkout design. Here’s the way we designed and intend for things to work. If you are noticing specific differences please create a ticket at our help desk with details and we can help you more.
If you have PayPal buttons added to your product page and/or cart page, and the buyer uses this button to checkout, well then the system wouldn’t know their shipping address until they log in to PayPal. Their shipping address from PayPal is returned to the site where a Final Review page would be displayed (unless you have this disabled in settings.) This final review page is where they would see shipping/tax calculations based on that PayPal address returned, and they could edit that address if they want and complete checkout from there.
If the Woo checkout page was used and they filled in the billing/shipping address there, then that address should be sent over to PayPal with “address override” enabled. This means they won’t be able to change their address once at PayPal, and the address they enter on the Woo Checkout page should carry all the way through.
So it sounds to me like your buyers must be skipping your checkout page, and then you have the Final Review page being skipped, so they never get to the opportunity to review that and adjust the address if they want to.
That’s the way it should be working. If you’re noticing something different please create a ticket and provide details on how we can reproduce it.
Hi Drew,
Thanks so much for the reply. I will open a ticket as you requested. To help tie this up for future readers.
1) Yes, I have the final review page turned off. I don’t remember if that was default or if I chose that on install.
2) I don’t see a setting in the paypal complete payments admin settings page for address override.
3) I worked diligently to recreate the customers issue, and the only answer I could come up with is customer error. It is easy to overlook the final review, which does clearly albeit smallishly, display the address with an edit button.
Hi
Using this plugin with shipping easy and its not returning the phone number in shipping
area of order in woocommerce
so you know issue in data sending to shipping easy
is there solution for this
thanks
PayPal only returns a phone number if it was included by the buyer during checkout. If you want to you can adjust your PayPal account so that it requires a phone number. Just go to this page in your PayPal account: https://www.paypal.com/businessmanage/preferences/website
There you’ll find an option for Contact Telephone Number, and you can set it to “On (required field)”. Then it will always return back to the site and get saved with the order.
Hi,
thank you for the great plugin. I have one issue on the checkout page. I would like to get rid of the message at the top which says:
“Skip the forms and pay faster with PayPal!”
But there is no text field in the plugin settings where this message can be removed or changed. I think there was one before, but after having used the plugin for a while, it’s gone-
Are you working in Classic Express or the new Complete Payments gateway? Please submit a ticket to our help desk with that info and we can help you get this resolved.
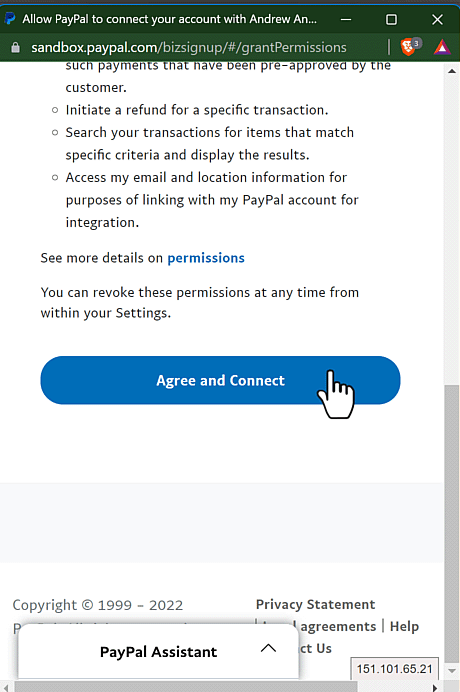
During the upgrade process I get the below:
I authorise Angell EYE, LLC to:
Use PayPal to process my buyers’ payments.
Initiate steps to authorize and capture my customers’ payments.
Search through and access corresponding transaction data.
Automatically deduct their fee from each PayPal transaction prior to the remaining balance settling to your PayPal account. The amount of this fee, is subject to your agreement with Angell EYE, LLC.
Obtain prior approval for future payments from customers on my behalf, and initiate and manage such payments that have been pre-approved by the customer.
Initiate a refund for a specific transaction.
Search your transactions for items that match specific criteria and display the results.
Access my email and location information for purposes of linking with my PayPal account for integration.
Does Angell Eye get any % of payments? Some of these permissions seem unnecessary.
I agree some of these seem unnecessary even redundant. I have passed that info over to PayPal’s partner integrations team. Hoping for some improvement on that in the not-so-distant future.
Yes, one of the things PayPal is doing with this new system is allowing partners to keep a fee of their own. This is offset by the overall reduced fee that PPCP gives you.
For example, the default rate with PayPal Classic (and Stripe, Square, etc.) is 2.9% With PayPal Commerce it is 2.59%. Angell EYE adds 0.1%, so it’s 2.69% total, which is what we show during the sign-up and in all of our docs.
If you have a lower negotiated rate with PayPal that you’re getting on Classic, I can get them to match that for you in PayPal Commerce, but we’ll need to do that first or you’ll be at the standard PPCP rate until it’s done. For that you can create a ticket here and we’ll get you taken care of.
Hopefully that clarifies things for you. Let me know if you have any questions or concerns about that.
Thanks!
Drew
Why are you guts taking a % of store sales? Any transaction fee savings should be passed on to the store, and you should be charging a flat rate for your plugin. This setup isnt ethical at all.
And is this even necessary? Because the “possible interruptions” statement pinned in our store admin sure makes it seem so…
The integration of thid and the permisdions you get is not ok. We would prefer the old api method without going through a 3rd party app at all. Are you claiming paypal is going to stop supporting those versions?
The rates for direct credit card processing dropped from 2.9% in PayPal Classic to 2.59% in PayPal Commerce. Along with this, our partnership agreement with PayPal has changed, and they now give partners the ability to keep a “platform_fee”, which is what we’re doing. It only adds 0.1%, so you’re still saving money over what you would be paying on PayPal Classic. We do have plans to decrease this as your volume grows over time. Also, while PayPal Classic has a $30/mo fee associated with Payments Pro (which gives you the direct CC processing option), the Commerce platform does not.
PayPal is really pushing partners like us to get people migrated into the new system, so that’s why we originally had a deadline in that admin notice. We actually removed that because it was freaking people out. If you have the latest version of our plugin installed you should see that the notice no longer includes that statement.
They are no longer “officially supporting” the classic API. However, no, they are not going to be turning that off any time soon. It’s just that you won’t get all the new stuff that they have now and will be adding going forward, and if you submit tickets to PayPal for support about something in Classic they are going to try and push you into the Commerce Platform.
I understand your initial hesitation and frustration, but again, the end result for you is more features and lower fees. For example, Apple Pay is available in the Commerce integration, but not in Classic. Google Pay will be coming soon to Commerce, but not Classic. PayPal recently launched their crypto stable coin, PYUSD, and this is all part of the new platform as well.
Of course, I stand behind my customer support and believe that you’ll find it’s the best in the industry. If you have any issues with payments we are here to help. We reply quickly, and we provide answers. If you ever need something custom done, we can turn that sort of stuff around pretty quickly and make things work exactly like you need.
If you want to continue with the Classic API for now that is okay. It’s not going to suddenly stop working. Just make sure you’re not overlooking the benefits.
If you would like to discuss this in more depth I’m happy to schedule a meeting with you. Just submit a ticket to our help desk and we can get that scheduled.
Hope that’s helpful!
Drew
I enabled the advanced Credit Card option, however I noticed when typing the credit card number it is cutting off part of the number making it very difficult to read. The CVC and Date are both displaying correctly. I would be happy to email a screenshot.
It sound like there is a CSS adjustment that needs to be made to play nicely with your theme. I can help you with that. Please create a ticket at our help desk with that screenshot and a link to where this is happening. We’ll get you taken care of.
I updated to Paypal Commerce but am getting charged much higher Paypal fees than advertised when prompted to install the new plugin.
“The rates for direct credit card processing dropped from 2.9% in PayPal Classic to 2.59% in PayPal Commerce.”
The rates I’m being charged are 3.49% + $0.49
What am I doing wrong and how do I receive the advertised rates?
Hi Terry,
I’m sorry for the confusion. The lower rate is what you get with the Advanced Credit Card option that comes with the PayPal Commerce gateway. This is where people just enter their CC details like any other processor, but PayPal undercuts the rate on competitors for this particular product. The higher rate you’re seeing is when people pay through “PayPal Branded” options like PayPal Checkout, Pay Later, or Venmo. These options come with a lot more value than just CC processing, so they have a higher rate for that. By most studies I’ve seen websites typically see about 70% of their volume processed through the direct CC option, so you’ll get the lower rate on most of the orders, and you won’t lose sales when people want to pay with one of the other options. Hope that clarifies things. Let me know if you have any questions or concerns about that.
Thanks!
Drew
Hi all,
I’ve been looking everywhere for a simple answer and paypal have been as much use as a fart in a spcesuit!
Does this plugin have the abilty for payments to be automatically split between marketplace and vendor and payments to go directly to vendors without having to do mass payments or any other type of manual payout?
Many thanks.
Hi James,
Yes, when you install the main PayPal for Woo plugin you’ll see an option to install the “Multi-Account” add-on. This is what gives you the functionality you’re looking for. I’m still a bit behind on updating our docs to match all the latest version of everything, but you should be able to get through it once you have the multi-account functionality installed. Let me know if you have any questions when you get there.
Thanks!
Drew