Installing the PayPal for FileMaker custom functions is very quick and easy. Just follow these steps and you’ll be up-and-running in no time!
Step 1 - Download the PayPal for FileMaker Solution File
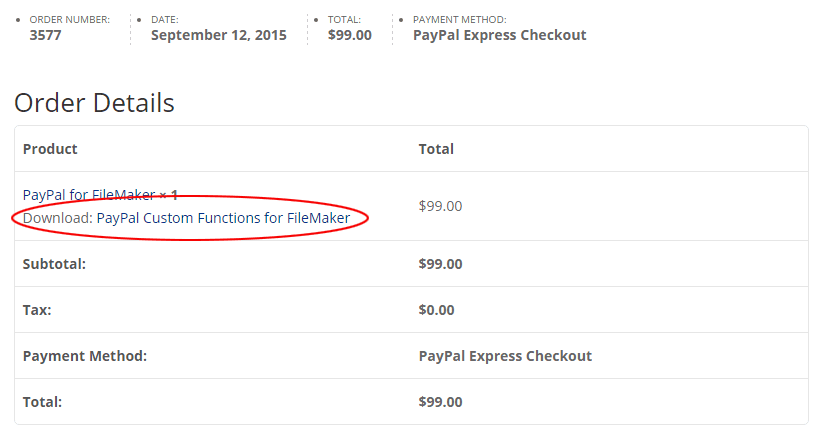
- Upon purchasing PayPal for FileMaker your receipt page and email will provide a download link for the solution file.
- Extract the contents of the zip file to the location where you save your FileMaker database files.
PayPal for FileMaker Download Link
Step 2 - SmartPill Plugin
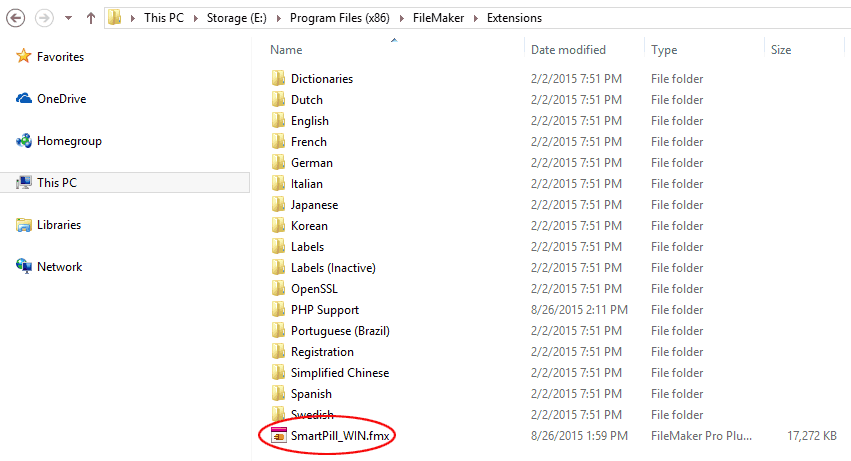
- The SmartPill plugin is included with your download and comes in different flavors depending on your operating system and FileMaker version.
- Extract the SmartPill zip file for the version that you need to the Extensions folder in your FileMaker install directory.
PayPal for FileMaker Scodigo SmartPill
Step 3 - Configuration
- Open the AE_PayPal_Library solution file.
- The first time you launch the solution you will be taken to the configuration page.
- Follow the instructions provided on this screen to obtain your PayPal API credentials and populate the fields accordingly.
Sandbox Setting
- PayPal provides a testing server (sandbox) that you can use to run transactions without spending actual money. This allows you to fully test solutions prior to going live. If you need help with this take a look at our tutorial for setting up PayPal sandbox accounts.
- true – This value will run transactions against PayPal’s sandbox / test server.
- false – This value will run transactions against PayPal’s live server.
API Credentials Settings
- You will need to enter the API Username, Password, and Signature for your PayPal account. Click one of the two buttons provided to quickly obtain these values for your PayPal account, and then copy / paste those values into the corresponding fields on the config screen.

Buttons to easily obtain PayPal API credentials for live or sandbox accounts.
- NOTE: If you are working with the PayPal sandbox you will need to make sure you enter API credentials from a PayPal sandbox account. Your live PayPal credentials will not work if you are using Sandbox mode!
- NOTE: The ApplicationID and the DeveloperAccountEmail are not required to be filled in. Those will be used for Adaptive Payments APIs, which are not yet included with this solution, so they can be ignored for now.
Step 4 - Add AE_PayPal_Library Tables
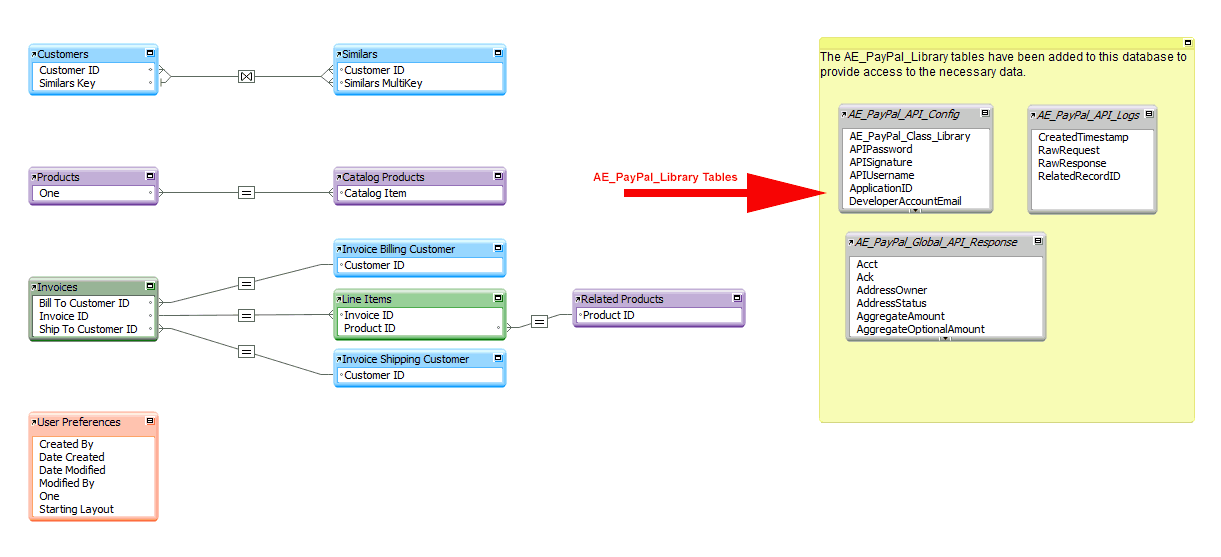
- To provide easy access to the scripts and global field data provided by the solution file you will need to add its tables to your own FileMaker database.
- In your FileMaker file, go to File -> Manage Database.
- Click on the Relationships tab.
- Add the AE_PayPal_API_Config, AE_PayPal_API_Logs, and AE_PayPal_Global_API_Response tables to your database file, and click OK to save the changes.
FileMaker PayPal Database Setup
Now What?
Now that you’ve installed the PayPal for FileMaker solution you may take a look at our User Guide for more details on how to integrate PayPal APIs into your FileMaker database.
Hi Andrew
Will this Plug in work in WebDirect on Filemaker server in Filemaker Cloud.
Thank you.
It does, but please make sure you see the note about Scodigo in the product description. You will need to purchase a Scodigo license separate from this solution in order for everything to work.
Andrew
In the product description it says,
“The FileMaker PayPal solution file includes a license for use with this solution, so you will not need to purchase your own license.”
Does this mean that I do not need to purchase Scodigo for the demo but I do need to purchase the server version if I want to run it in FM Cloud.
Thank you.
Vincent
I’m sorry for the confusion. You do need your own license now. I didn’t realize I never removed that line about it being included. Thanks for pointing it out.